Monthly Archives: July 2012
Whitebox for Studying, VMware VSphere, ESX & ESXi Hypervisors, VCP and VCAP Exam
This Whitebox is highly recommended and intended for those, who are passionate to VMware, want to study Virtualization using VMware VSphere, and really want to study the internals/workings of VMware VSphere 4/5 and the enterprise features offered by this wonderful product. Also for those, who wants to do VCP and VCAP exam offered by VMware.
In my experience, without a higher end desktop and computer components it will be very difficult to understand and tame this beast !!
1, Intel Processor
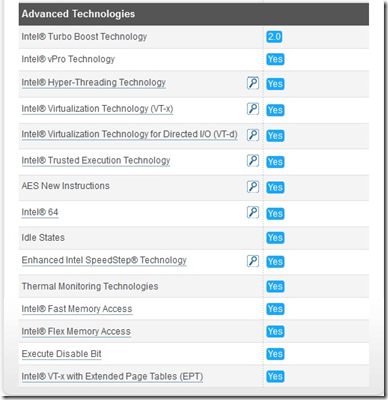
3rd Generation Intel Core i7 Processor
Intel-Core-i7-3770-Processor-(8M-Cache-up-to-3_90-GHz)
http://ark.intel.com/products/65719
2nd Generation Intel Core i7 Processor
Intel Core i7-2600 Processor (8M Cache, up to 3.80 GHz)
http://ark.intel.com/products/52213
2, Intel mother board
Intel Desktop Board DZ77RE-75K Extreme Series
Intel Desktop Board DZ77GA-70K Extreme Series
Intel Desktop Board DZ68BC
http://www.intel.com/content/www/us/en/motherboards/desktop-motherboards/desktop-board-dz68bc.html
3, Internal SATA Harddisk
Seagate 4 x 1 TB SATA HDD, you will get a total 2TB in RAID 10
Seagate Barracuda 1 TB HDD Internal Hard Drive (Model number ST1000DM003)
Key Features of Seagate Barracuda 1 TB HDD Internal Hard Drive (ST1000DM003)
3.5 inch Form Factor
SATA 6.0 Gbps Interface
64 MB Cache Memory
7200 RPM Spin Speed
Average Seek Time – 9.5 ms (Write)
1 TB HDD
300000 Load / Unload Cycles
Make a RAID 10 in the BIOS using Intel Rapid Storage Technology (Intel RST) and install windows 7 64 Bit, you need to copy RAID divers to a USB, and during the OS installation.
The HDD is SATA 6Gbps and has 64 MB cache, and on the mother board 4 sata 6Gbps ports are there and in RAID 10 you will very good speed.
4, RAM
4 x 4 GB DDR3 1333, Kingston or Corsair, if you get 8GB modules that will be fine, so 4 x 8 GB you will get 32 GB the mother board has the capacity.
Kingston ValueRAM DDR3 4 GB PC RAM (KVR1333D3N9/4G)
Key Features of Kingston ValueRAM DDR3 4 GB PC RAM (KVR1333D3N9/4G)
DDR3-1333/PC3-10600
DIMM Memory Module
240-pin Configuration
9-9-9 CAS Latency
1.5 V Specified Voltage
Unbuffered
64 x 512 MB DRAM Structure
Corsair DDR3 4 GB (1 x 4 GB) PC RAM (CMV4GX3M1A1333C9)
Key Features of Corsair DDR3 4 GB (1 x 4 GB) PC RAM (CMV4GX3M1A1333C9)
DDR3-1333/PC3-10600
DIMM Memory Module
240-pin Configuration
9-9-9 CAS Latency
1.5 V Specified Voltage
166 MHz Memory Clock Speed
1 x 4 GB DRAM Structure
Corsair Vengeance DDR3 8 GB PC RAM (CMZ8GX3M1A1600C10)
Key Features of Corsair Vengeance DDR3 8 GB PC RAM (CMZ8GX3M1A1600C10)
DDR3 1600/PC3 12800
DIMM Memory Module
240-pin Configuration
10-10-10-27 CAS Latency
1 x 8 GB DRAM Structure
5, Power supply – Cooler master or Corsair
Cooler Master Extreme Power Plus 500W 500 Watts PSU
Key Features of Cooler Master Extreme Power Plus 500W 500 Watts PSU
500 W Power Output
ATX 12V v2.3
180 – 264 Vac Input Voltage
2 x 12V Power Rail
70 % Efficiency
100000 hours MTBF
http://www.coolermaster.com/product.php?product_id=3738
Corsair CMPSU-430CXV2UK 430 Watts PSU
Key Features of Corsair CMPSU-430CXV2UK 430 Watts PSU
430 W Power Output
ATX 12V v2.3
1 x 12V Power Rail
90 – 264 Vac Input Voltage
80 % Efficiency
100000 hours MTBF
Corsair VS450 450 Watts PSU
Key Features of Corsair VS450 450 Watts PSU
450 W Power Output
ATX 12V v2.31 and EPS 12V v2.92
2 x 12V Power Rail
240 Vac Input Voltage
100000 hours MTBF
80 % Efficiency
OVP / OCP / UVP / SCP
Corsair CMPSU-500CXV2UK 500 Watts PSU
Key Features of Corsair CMPSU-500CXV2UK 500 Watts PSU
500 W Power Output
ATX 12V v2.3
1 x 12V Power Rail
90 – 264 Vac Input Voltage
80 % Efficiency
100000 hours MTBF
6, Cabinet ATX – Cooler master
Cooler Master Elite 431 Mid Tower Cabinet
Cooler Master Elite 310 Cabinet
Cooler Master Elite 311 Mid Tower Cabinet
http://www.coolermaster.com/category.php?category_id=20
7, Install windows 7 64 bit, VMware worksation 8, and use Starwind as an ISCSI software SAN, for the shared storage and it is free you can download.
http://www.starwindsoftware.com/starwind-iscsi-san-overview
8, You can install the Vcenter, DNS and Starwind in one VM and you can install ESXi/ESX and play accordingly
Find the Driver modules in VMware ESXi and ESX VMkernel
Some times we need to find, what are the driver modules loaded in the VMkernel, for example the ethernet and fiber channel HBA adapters driver modules. Some times we need to find the driver version, features and capabilities of the driver and its associated device. And many times we need set or change some advance parameters like
– Queue Depth for QLogic and Emulex HBAs
– Flow Control in network interface
Usage: esxcfg-module <options> <module>
-g Get the options for a given module and whether it is loaded on boot.
-s Set the options for a given module.
-e Enable a given module, indicating it should be loaded on boot.
-d Disable a given module, indicating it should not be loaded on boot.
-q Query enabled modules options.
-u Unload a module.
-l List all loaded modules.
-I Show Module Info.
1, Listing all modules on an ESX/ESXi 3.x, 4.x and 5.x:
To list all the modules currently loaded on an ESX/ESXi host:
esxcfg-module -l | grep <module name>
or simply
esxcfg-module -l | less (you can scroll up and down)
OR
vmkload_mod -l | grep <module name>
or
vmkload_mod -l | less
2, Query the system for the modules to load at boot. this will show the corresponding driver is configured to load during the boot of VMkernel
esxcfg-module -q | less
3, Listing all available options for a specific module on an ESX/ESXi host
vmkload_mod –showinfo <module name>
REFERENCES
http://kb.vmware.com/selfservice/microsites/search.do?language=en_US&cmd=displayKC&externalId=1267
http://kb.vmware.com/selfservice/microsites/search.do?cmd=displayKC&docType=kc&externalId=1017588
Format a ESX & ESXi VMFS file system manually
Recently I came across a query in the VMware communities, the query was “How to reformat a VMFS file system or Datastore manuallly”
The preferred method of reformat the VMFS file system is from a console or SSH session as you can simply recreate the file system without having to make any changes to the disk partition.
Note: All data on a VMFS volume is lost when the datastore is recreated. Migrate or move all virtual machines and other data to another datastore. Back up all data before proceeding.
Note: This procedure should not be performed on a local datastore on an ESX host where the Operating System is located as it may remove the Service Console privileged virtual machine which is located there.
From the ESX/ESXi console:
Use the vmkfstools command to format the VMFS-5 or VMFS-3 datastore (Partition), specifying a Block Size of 1 to 8MB, a friendly name for the datastore, and the chosen disk device and the created partition.
vmkfstools -C vmfs3 -b BlockSize -S DatastoreVolumeName /vmfs/devices/disks/ DeviceName:Partition
vmkfstools -C vmfs5 -b BlockSize -S DatastoreVolumeName /vmfs/devices/disks/ DeviceName:Partition
STEPS:
1, Storage vMotion, or move the virtual machines located on the datastore you would like to re format.
2, Log in to the Local Tech Support Mode console of the ESX/ESXi host. For more information, see Unable to connect to an ESX host using Secure Shell (SSH) (1003807), Tech Support Mode for Emergency Support (1003677), or Using Tech Support Mode in ESXi 4.1 and ESXi 5.0 (1017910).
3, Use the esxcfg-scsidevs command to obtain the disk identifier (mpx or naa) for the datastore you want to re format.
# esxcfg-scsidevs –m
4, Use vmkfstools to create a new VMFS datastore file system with the corresponding block size.
Note: vSphere 5.0 and later releases have a block size of 1MB only. For ESX/ESXi in Vsphere 4 it is from 1MB to 8MB
# vmkfstools -C VMFS-type -b Block-Size -S Datastore-Name /vmfs/devices/disks/Disk-Identifier:Partition-Number
For Vsphere 5x
vmkfstools -C vmfs5 –b 1m -S Storage1 /vmfs/devices/disks/mpx.vmhba1:C0:T0:L0:3
For Vsphere 4x
vmkfstools -C vmfs3 –b 8m -S Storage1 /vmfs/devices/disks/mpx.vmhba1:C0:T0:L0:3
5, Performing a rescan of the storage on an ESX/ESXi host
Using the ESXi 5.x
To rescan all HBAs:
esxcli storage core adapter rescan –all
To rescan a specific HBA:
esxcli storage core adapter rescan –adapter <vmkernel SCSI adapter name>
Where <vmkernel SCSI adapter name> is the vmhba# to be rescanned. To get a list of all adapters, run the esxcli storage core adapter list command.
OR
esxcfg-rescan <vmkernel SCSI adapter name>
esxcfg-rescan –all
Where <vmkernel SCSI adapter name> is the vmhba# to be rescanned.
In Vsphere 4x
esxcfg-rescan <vmkernel SCSI adapter name>
esxcfg-rescan –all
Where <vmkernel SCSI adapter name> is the vmhba# to be rescanned.
Or simply in Vsphere 4x and 5x
To search for new VMFS datastores, run this command:
vmkfstools –V
Note: This command does not generate any output.
REFERENCES
http://kb.vmware.com/selfservice/microsites/search.do?cmd=displayKC&externalId=1009829
Find Virtual Machine Monitor (VMM) execution mode
In VMware ESX/ESXi hypervisor, for each virtual machine there will be one VMM running parallel in side the hypervisor kernel . The VMM is the heart of every virtual machine, the VMM sits in between the Virtual machine and hypervisor kernel. The VMM translates the Virtual machine requests like CPU, RAM, IO etc to the VMkernel, then the VMkernel will schedule and executes those virtual machine requests.
So to understand how the VMM works and what kind of execution engine is used by the VMM ? etc is important and this can be easily found from the virtual machine log file.
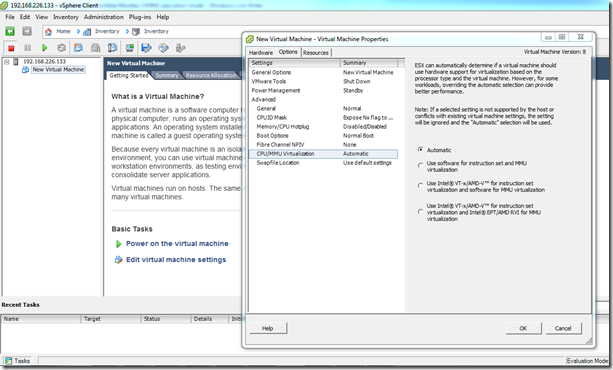
In the ESX/ESXi host, browse the datastore, open the virtual machine log and check the below lines, the red line indicates the current VMM execution engine is it using, whether the processor is capable of hardware memory management unit which is used or memory virtualization.
2012-04-15T09:30:43.171Z| vmx| MONITOR MODE: allowed modes : BT32 HV HWMMU
2012-04-15T09:30:43.171Z| vmx| MONITOR MODE: user requested modes : BT32 HV HWMMU
2012-04-15T09:30:43.171Z| vmx| MONITOR MODE: guestOS preferred modes: HWMMU HV BT32
2012-04-15T09:30:43.171Z| vmx| MONITOR MODE: filtered list : HWMMU HV BT32
2012-04-15T09:30:43.171Z| vmx| HV Settings: virtual exec = ‘hardware’; virtual mmu = ‘hardware’
2012-04-15T09:30:43.171Z| vmx| VPID and EPT Capabilities (0x00000f0106114141)
2012-04-15T09:30:43.171Z| vmx| EPT memory type WB yes
2012-04-15T09:30:43.171Z| vmx| 2MB super-page yes
2012-04-15T09:30:43.171Z| vmx| INVEPT support yes
2012-04-15T09:30:43.171Z| vmx| Type 1 INVEPT yes
2012-04-15T09:30:43.171Z| vmx| Type 2 INVEPT yes
HWMMU = Hardware memory management unit
– The processor should have EPT or RVI, EPT (Extended Page Tables) for Intel and RVI (Rapid Virtualization Index) for AMD
HV (means processor is capable of Hardware assistance and the vm can use)
BT32 = Binary Translation 32 (When using BT32 (BT32 you can see only in Intel processors), the virtual machine runs with software virtualization for as long as possible, but it dynamically switches to hardware virtualization if the virtual machine enters 64‐bit mode.)
BT = Binary Translation invented by the VMware, this is a software based technique to virtualize a CPU, that it will translates the virtual CPU instructions to the real physical CPU instructions.
You can change the VMM execution mode for a virtual machine, as below
1 – Power off the VM
2- Edit the VM settings
3- Go to “Options” menu bar > select the “CPU/MMU Virtualization” section
4 – There you can change
NOTE – It is not recommended to change these settings, in some workloads and some specific scenarios we can change.
HP Virtual Connect (VC) Network Traffic Layout
Here we are going to discuss a scenario, where I need to divide the entire network traffic which is going inside the HP blades and HP VC in a HP Blade system C7000
Hardware Details
– HP Enclosure = BladeSystem C7000 Enclosure G2
– HP Blades = BL680c G7
– HP Virtual Connect Flex Fabric
– Dual Port FlexFabric 10Gb Converged Network Adapter
– Dual Port FlexFabric 10Gb Network Adapter
Network Traffic Details
– VMware Vcenter
– FT and VMotion
– Oracle RAC Cluster
– Production Application servers
– DMZ1 (Production Web Traffic)
– DMZ2 (Production Database Traffic)
– Corporate Servers
With the above network traffic classification, these need to be separated due to the huge network load and considering security aspect also. This is one of the scenario which I came across while designing VSphere 5 with HP 3PAR and HP C-Class Blade Center for a leading Bank.
So there is no hard and fast rules, you can divide accordingly based on the requirement.
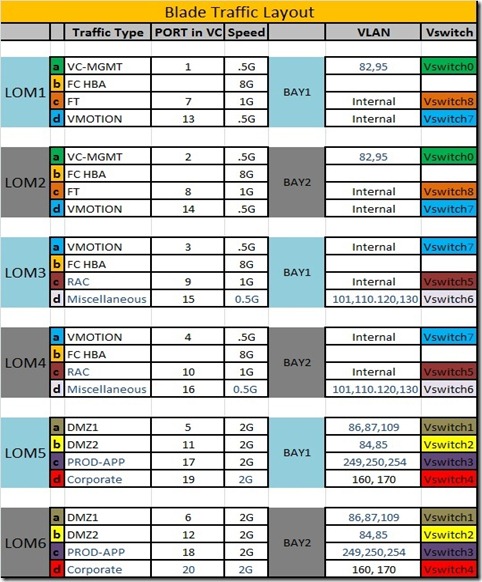
Table-1 is the network traffic division.
More Details-
Each blade is having 3 x Dual port 10Gig FlexFabric adapter on board. So total there is 6 x 10Gig ports, they are called LOM (Lan On Motherboard) ports. That is LOM1 to LOM6, and each LOM is internally further divided in to 4 adapters, and these 4 adapters share a common bandwidth that is they can have maximum of 10G. And we can divide the traffic inside for each LOM, that is the beauty of the FlexFabric adapters.
Here LOM1 to LOM4 are 10G FlexFabric Converged adapters (FCOE), so each LOM have one FC port and this is used for the SAN traffic. LOM5 and LOM6 are normal 10G FlexFabric adapters.
There are 2 HP Virtual Connect (VC) modules in the enclosure, they are connected to the BAY1 and BAY2, for redundancy LOM1, LOM3 and LOM5 is internally connected to the BAY1 and LOM2, LOM4, LOM6 to BAY2. There will one uplink for network and one uplink for FC Switch (SAN) for each VC, this will give the redundancy, HA, and load balancing and both VC are in Active/Active mode. So each traffic will have at least 2 adapters 1 from each LOM, this will give the redundancy, HA, Load balancing etc.
The VC is simply a Layer 2 network device, it wont do the routing.
NOTE-
Here the VMotion and FT traffic flow is happening inside the blade center Back Plane it self, and is not going to the VC or external core switch.
This is a specific scenario, here each blades inside the enclosure is configured together as one ESXi Cluster and so there is no need to do VMotion or FT outside the Blade. Here the advantage is that the VMotion and FT traffic wont overload the VC or core switch.

![clip_image002[6] clip_image002[6]](https://pibytes.files.wordpress.com/2012/07/clip_image0026_thumb.jpg?w=642&h=57)
![clip_image004[4] clip_image004[4]](https://pibytes.files.wordpress.com/2012/07/clip_image0044_thumb.jpg?w=642&h=86)

